Firstly, before I get down to business, lets have a little laugh! Below her example of Eyebrow shapes gone terribly WRONG!
 | |
| I woke up like this! |
 |
| Fine Girl :-) |
 | |
| Selfie tins |
 |
| Caption this! |
Sigh! I mean I can't stop laughing. It's pictures like this that inspired me to make a post specially dedicated to shaping the perfect eyebrows.
Perfectly groomed eyebrows do wonders to enhance any face. But when it comes to eyebrow maintenance, there's a very fine line between the perfect shape and the oh-so-easy, over-plucked look. Sometimes, a few seconds of zealous tweezingcan lead to a few agonizing months of re-growth.
If you decide to employ shaping skills of a professional, there are a number of options one can try: Waxing, Tweezing, Threading or even Laser treatment. All these are just some of the hair removal methods on the market today.
Here's is how to get the best shape for your brows no matter which option you choose.
1. Know what suits your face shape:
It is fair to say that every person has a different facial shape (Even some twins), and the particular lines and angles of that face will determine what type of brow works for you.2: Neaten up.
For that extra polished look, brush your brows upward, using a brow comb. Then using a small set of scissors, to gently and carefully cut the ends of any longer hairs. Do the same downwards.3: Know the beginning, the middle and end.
 |
| Use the tip of a brush to double check where your is. |
 |
| I hope this this :-) |
Hint: Double check that the bridge of your nose sits squarely in the middle of these two starting points before and after plucking.
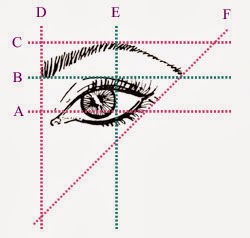
The Middle: The mid to the end point of your brow is also known as the highest point of your natural arch. Measuring with a straight object, ensure your arch sits parallel to the outside of your iris.
The End: Angle the straight object one more, this time diagonally from your nostril to the outside corner of your eye. Continue to line up to what should ideally be the end point of your eye.
4: Though thick and thin, with an eyebrow stencil.
According to your face shape and naturally, your personal preference, you will be working with a thicker or thinner browSome of us are blessed with set of full, thick lines to shape and style as we please. If this is you, then tweeze away according to the tips above.
If your eyebrows are on the thinner side like me :-(, when you shape your brows, "fill' with your eye pencil.
5: Choose the perfect process.
Many of us leave our arch shaping to the deft hands of professionals. However, it can be confusing to decide what type of method you would like them to use: tweezing, waxing, threading, or laser?Generally, tweezing is the best for light maintenance (i.e. clearly up a few strays or lightly re-shaping an arch), where waxing is reserved for dark and wiry brows that grow back thick, quick and strong.
Hint: When tweezing, you can use ice to numb your brows for a less painful ordeal.
Threading has emerged in recent years as a great alternative to waxing. A thin thread is doubled, twisted, and rolled over areas of unwanted hair at the follicle level.
From a personal point of view, this method is painful, but you'll find the pain is worth it. Threading is a great way to remove short lines of hair and provides precise control.
There you go ladies, I hope you found this useful.
BeautyByMs
xo
Tweet

